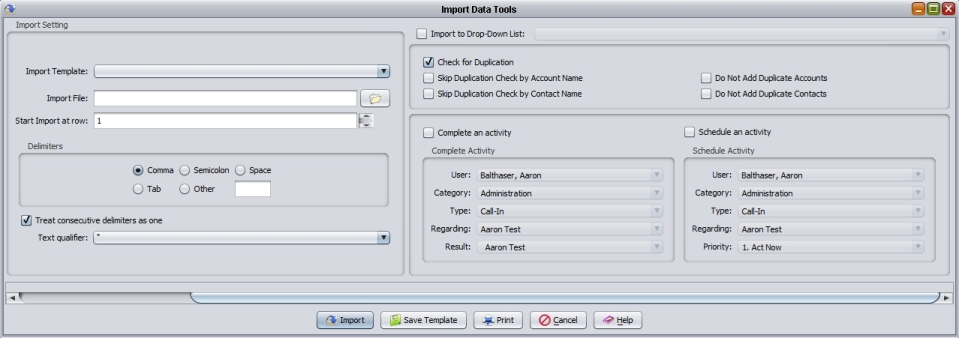

The Wintouch Import Data Tool gives you the ability to import outside data into Wintouch, import prospect lists directly into Wintouch and schedule activities for sales representatives at the same time. With the duplicate check feature, users can avoid double entry and, at the same time, add information to existing accounts. Mapping is a breeze, and once the data is in Wintouch , reporting tools are available making it easy to manage marketing campaigns and monitor progress on opportunities. You can import plain text data files in various formats, including Comma, Semicolon, Space, and Tab delimited.
Import Settings
Import Template: Open this dropdown box to access and select any template that has been generated for frequent use. The template will contain fields from Wintouch that have been pre-assigned to the column headers.
Import File: Use this feature to select which file you would like to import to Wintouch. Click on the folder button to begin browsing for your file.
Start Import at row: After you have selected your file and the data has populated the Import Data Pane, you will see that each row is assigned a number on the left side of the pane. Use this feature to choose from which row you would like to start your import.
Treat consecutive delimiters as one: When checked, this box recognizes fields that may or may not have data by creating a bland field in the design pane where there are consecutive delimiters.
Text Qualifier: You may have information that you would like to import that contains delimiters. You may put either double or single quotes around this information in the text file so that Wintouch will recognize the information as one record.
Delimiters
Comma: If selected, commas will denote record change in the uploaded text file.
Semicolon: If selected, semicolons will denote record change in the uploaded text file.
Space: If selected, spaces will denote record change in the uploaded text file.
Tab: If selected, tabs will denote record change in the uploaded text file.
Other: If selected, your defined delimiter will denote record change in the uploaded text file.
Import to Drop-Down List
Import to Drop-Down List: Imports directly to the drop down lists in Wintouch (Account Size, Account Types, Activity Types etc.). The drop down list file will need to contain a table item and table code.
Check for Duplication
Check for Duplication by Account Name: After the "Import" button is selected the Duplicate account window will appear if at least one existing account has the same account name, e-mail address, or telephone number as the new account.
Check for Duplication by Contact Name: After the "Import" button is selected the Duplicate contact window will appear if at least one existing contact has the same contact name, e-mail address, or telephone number as the new contact.
Note: A special behavior will occur if the following criterion is met.
- You are importing a contact with an address and an extended profile.
- A duplicate contact name is found during the import.
In this scenario Wintouch will tell you that a duplicate contact name has been found and you will be prompted to make one of two choices.
- If the contacts are not the same person you will select "Add" and the contact will be added as a unique contact into Wintouch with the address and the extended profile.
- If the contact is in fact already in Wintouch you will highlight the duplicate contact and press "Select". This will add the extended profile to the already existing contact and will NOT add the address.
Skip Duplication Check by Account Name: If checked, then Account Names will be excluded from a duplicate check.
Skip Duplication Check by Contact Name: If checked, then Contact Names will be excluded from a duplicate check.
Activities
Complete an Activity
User: This field allows you to select for which user you would like to complete an activity.
Category: Tab to this field to select a category (Department) for the activity being completed.
Type: Tab to this field to select the type of activity being completed. Call-In, Call-Out, etc.
Regarding: Tab to this field to enter a regarding item from the drop-down list for the activity. The choices in this field are determined by the selection you made in the Category field.
Result: Tab to this field to select the result of the completed activity. The choices in this field are determined by the selection you made in the Category field.
Schedule and Activity
User: This field allows you to select for which user you would like to complete an activity.
Category: Tab to this field to select a category (Department) for the activity being completed.
Type: Tab to this field to select the type of activity being completed. Call-In, Call-Out, etc.
Regarding: Tab to this field to enter a regarding item from the drop-down list for the activity. The choices in this field are determined by the selection you made in the Category field.
Priority: This field denotes the importance of the activity being scheduled.
Right Click Options
Right Click in Column Headers
Account: Right click in the column header and hover the mouse courser over this selection to open a menu in which you can select which field from the account profile you would like to import your data into.
Contact: Right click in the column header and hover the mouse courser over this selection to open a menu in which you can select which field from the contact profile you would like to import your data into.
Account - Contact: Right click in the column header and hover the mouse courser over this selection to open a menu in which you can select which field from the account - contact profile you would like to import your data into.
Address: Right click in the column header and hover the mouse courser over this selection to open a menu in which you can select which field from the address book you would like to import your data into.
Extended Profiles: Right click in the column header and hover the mouse courser over this selection to open a menu in which you can select which field from the extended profiles you would like to import your data into.
Insert a blank column: The need may arise to add a blank column to your data (for naming purposes). Right click on any column and choose "Insert a blank column" and a blank column will be added to the right of the column you clicked on..
Remove column assignment: Select this option to remove a column assignment previously assigned..
Right Click in Columns
Replicate this value in all rows: Selecting this option will replicate the highlighted value into all the rows.
Insert text in all rows: Selecting this option opens a dialog box that allow you to type text to insert in all the rows.
Rename: Selecting this option opens a dialog box that allow you to type text to insert in the selected row.
Delete: Selecting this option will delete the selected row.
Import: Once you have set all of the parameters correctly and have completed the mapping process, use this button to activate the import process.
Save Template: Once you have selected all the column headers to the template you want to save, select this button to save.
Print: Select this button to print a copy of the import data.
Cancel: Use this button to cancel the import process and exit Import Data Tool window.
Help: Displays the online help for the active window.