
Use the Template Builder to compose e-mail/letter templates in HTML format while incorporating Wintouch fields. The saved template can then be used to send individual emails, e-mail broadcasts, or to print individual letters. Open this window by selecting Options in the Main Desktop menu, then select Create Templates from the drop-down menu.
Window Map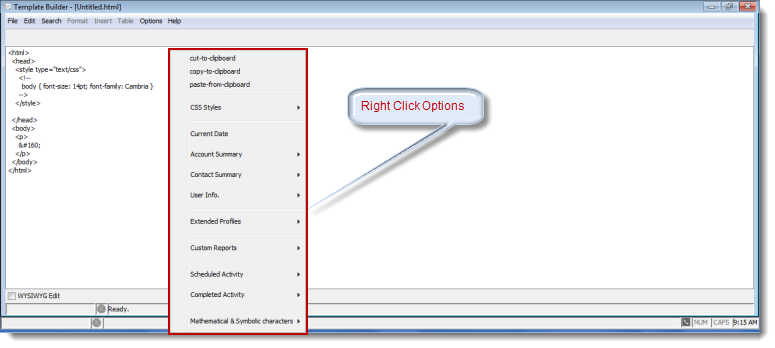
Cut: Use this command to remove and store highlighted text on the clipboard to be pasted elsewhere.
Copy: Use this command to copy and store highlighted text on the clipboard to be pasted elsewhere.
Paste: Use this command to place cut or copied text from the clipboard into the template.
CSS Styles: Use this feature to import styles from an external style sheet. The styles will be embedded into the template HTML as embedded styles.
Current Date: Use this command to insert the current date into the document.
Account Summary: Hovering over this option will open the fly out menu containing all the fields which are available for use in the template from the Account Summary.
Contact Summary: Hovering over this option will open the fly out menu containing all the fields which are available for use in the template from the Contact Summary.
User Info: Hovering over this option will open the fly out menu containing all the fields which are available for use in the template from the User information fields.
Extended Profiles: Hovering over this option will open the fly out menu containing all the fields which are available for use in the template from the Extended Profiles.
Custom Reports: Hovering over this option will display all the selectable custom reports.
Scheduled Activity: Hovering over this option will open the fly out menu containing all the fields which are available for use in the template from the Schedule an Activity window.
Completed Activity: Hovering over this option will open the fly out menu containing all the fields which are available for use in the template from the Complete an Activity window.
Mathematical & Symbolic characters: Use this command to insert mathematical and symbolic characters into your template.
Note: The Current Date and Mathematical & Symbolic characters can be inserted using the same procedure.
File
New: This command opens a new document.
Open: This command opens a previously created document.
Save: This command saves the changes made to the open document as a TemplateName.html file.
Note: When saving a template make sure the file name includes the HTML extension.
Save on AS400: Use this command to Save the template on the AS/400's IFS (Integrated File System) Files saved in this manner will be available to remote users from any computer connected to the server. To enable access to your templates saved on the AS/400, simply select your AS/400 from the Template Path Chooser window in Wintouch Preferences. Click Here for instructions with changes to template path in Preferences.
E-mail: This command is disabled. To send an e-mail using the template you have created, your must use E-mail broadcast, Print Template, or Complete an Activity features. Click here for more information on using your templates to send emails.
Print: Use this command to print the HTML source of the open template.
Close: Use this command to close your template without saving changes.
Edit
Cut: Use this command to remove and store selected text on the clipboard to be pasted elsewhere. (Ctrl+X)
Copy: Use this command to copy and store selected text on the clipboard to be pasted elsewhere. (Ctrl+C)
Paste: Use this command to place cut or copied text from the clipboard into the template. (Ctrl+V)
Select All: Use this command to select the entire document for the next command. (Ctrl+A)
Undo: Use this command to undo the last action you took. (Ctrl+Z)
Redo: Use this command to repeat the last action you took, or to reverse your last Undo command. (Ctrl+Y)
Search
Use this Search, Find, and Replace feature to edit your template.
Format
Formatting commands are enabled when the Browse Template check box is checked, allowing you to use menu items and tool bar icons to choose various fonts, colors, and effects. If the Browse Template check box is Unchecked, you must denote formatting in HTML
Insert
Use this feature to insert various HTML tags such as an image tag or a link tag.
Table
Use this feature to insert tables.
Options
Show Tool bar: Use this toggle on/off option to enable or disable the tool bar display for this Window.
Customize Tool bar: Click here for information about customizing the tool bar.
Help
Contents: Use this command to display the online help for the active window.
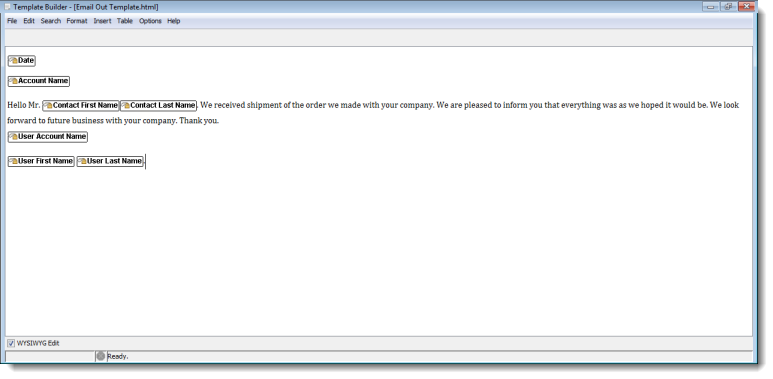
WYSIWYG Radio Button
WISIWYG is acronym which means
What You See Is What You Get. When this check box is selected the displayed during editing is done in a format that appears very similar to the final output, instead of doing the editing in the HTML source code view. And conceive
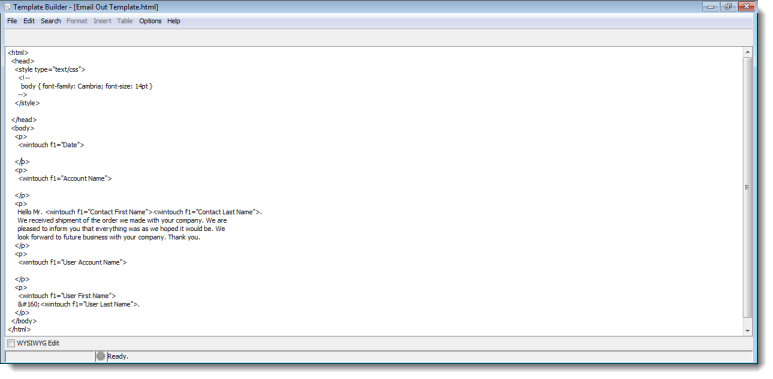
The following is an example of a template in both the HTML source code view and the WYSIWYG view.
HTML Source Code:
WISIWYG
Below you see the document as displayed from the Print Template function in the Account or Contact Summary window.
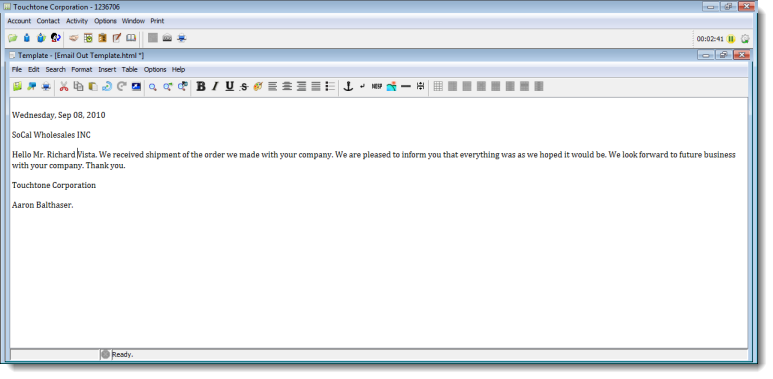
In this window, you will see the e-mail/letter as it will be seen by the recipient. All text, images, and formatting will be displayed, including Wintouch information from the active account or contact. To access this window from the Account or Contact Summary windows, under the Print menu, select Template.
Note: In this window, the formatting menu and tool bar functions are enabled, allowing the user to choose various fonts, colors, and effects.
To learn more about the Print Template window, click here.
When sending an e-mail using Wintouch, you will have the option to use a template. The following links will instruct you on the different ways to send an e-mail through Wintouch.
Sending an E-mail Broadcast