
Designing Reports
Designing reports is a two-part process. First, you must tell Wintouch what kind of Accounts/Contacts you want information about by defining a group. Click here to go to the Defining Groups section of the Wintouch Online Help. Second, you must tell Wintouch what information you would like about that group by defining a report. When you define a report, you choose the fields you want displayed. The fields available to you will be determined by the level at which you run the report. You also have the option of either running a report just once without saving it, saving the chosen fields as a template which can then be run in combination with a variety of groups to generate different reports, or creating a custom report in which the combination of group and report template are saved as a one-click report to be run directly from the reports menu.
There are three main levels at which reports can be run, Profile and Address , Extended Profile , and Activities Each of these main levels contain sub-levels. The level you choose will determine both which records are returned and which fields are available to be displayed, in other words, the rows and columns of your report. The available fields will be the fields from the level at which you choose to run the report. Thus, if you run a report at the Profile and Address level, the fields available to you will be those from the Account and/or Contact and/or Account/Contact Relationship profile windows. If you run the report at the Extended Profile level, the fields available to you will be those from the window of the Extended Profile you select. If you run the report at the Activities level, the fields available to you will be those from the Activities windows. At both the Extended Profile and Activities levels, you will have the option of including fields from the other two levels. Go to the Include Fields from Other Levels sections using the Web Page Index above for more information.
Report Run Levels (Fields and Features Available)
- Profile and Address
- Extended Profiles
- Activities
Examples
- Standard Report
- Creating a Template
- Creating a Custom Report
- Viewing, Copying, and Moving Custom Reports
The Profile and Address Level (Standard Report)
The Profile and Address level of reporting includes the Account , Contact , and the Account/Contact , sub-levels. Running a report at this level will give you access to the fields in the Account , Contact , and the Account/Contact Relationship Profile windows. In the following procedure, we will be running our report at the Account sub-level. The purpose of this report will be to produce my top 5 accounts displaying their delivery addresses.
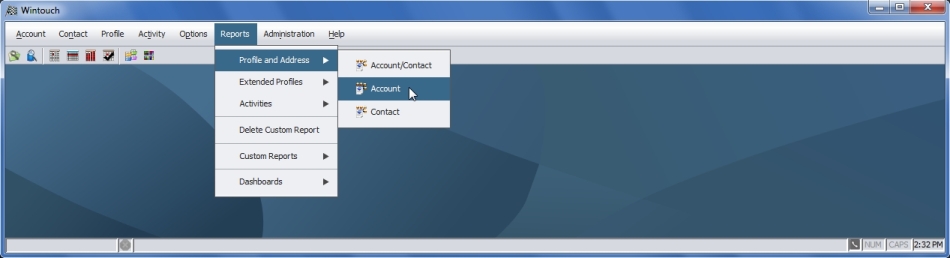
- From the Main Desktop menu select Reports , then Profile and Address , and then Account from the expanded menu.
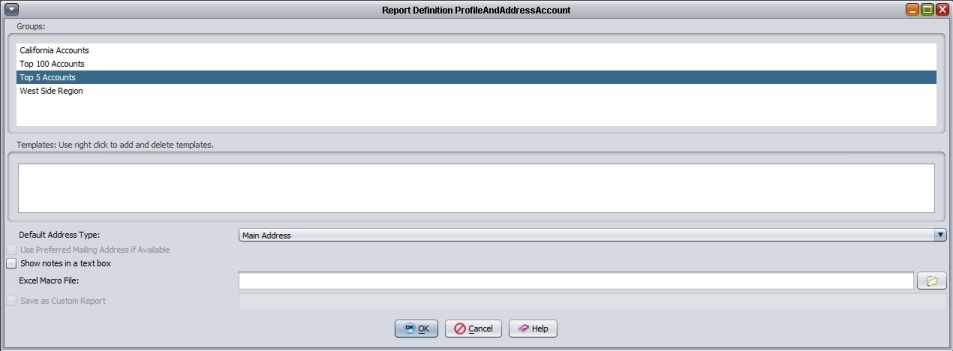
- When the Reports Definition window opens select a group and press OK .
Note: This will run a report based on the group definition that was defined in the group you selected. I predefined this group to produce my top 5 accounts.
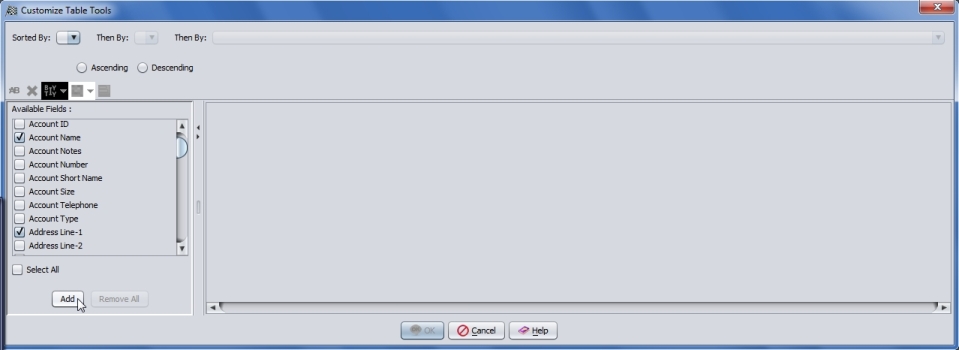
- After you press OK , the Customize Table Tools window will open. In the left window pane select the fields you wish to display in the report by checking the corresponding check boxes. I have checked Account Name , Address Line 1 , City , State , and Zip Code . When you are done select the Add button.
Note: The fields will appear in the right window pane after you select the Add button in the order by which you selected them when you checked the check boxes.
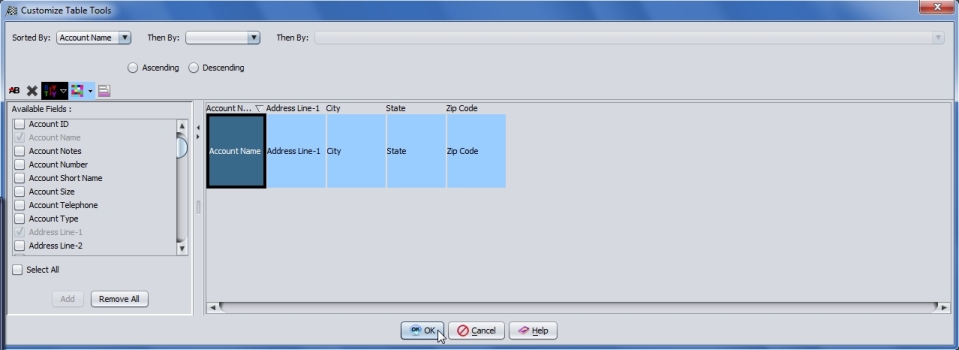
- After you press the Add button the fields will appear in the right window pane as columns. Here you can rearrange the order of the columns by dragging them by the column headers in either direction. When you are done press the OK button to view the report.
- In the below image I have produced a report of my top 5 accounts with their delivery addresses.

The Profile and Address Level (Creating a Template)
In the above example we produced a report that displayed the top 5 accounts with their delivery addresses. The group we used defined the accounts that were viewed. In the above example, the group retrieved our top 5 accounts. The portion of the report that produced the delivery addresses was defined in the Customize Table Tools window seen in steps 3 and 4 above. It is possible to create a template that will display the delivery addresses of any group that I use to run a report. I can create and name a template and it will remain stored in the Reports Definition window in the Templates pane. In the below example we will run the same report as above while creating a template that can be used to view the delivery addresses of accounts from other groups at a later time.
- From the Main Desktop menu select Reports , then Profile and Address , and then Account from the expanded menu.
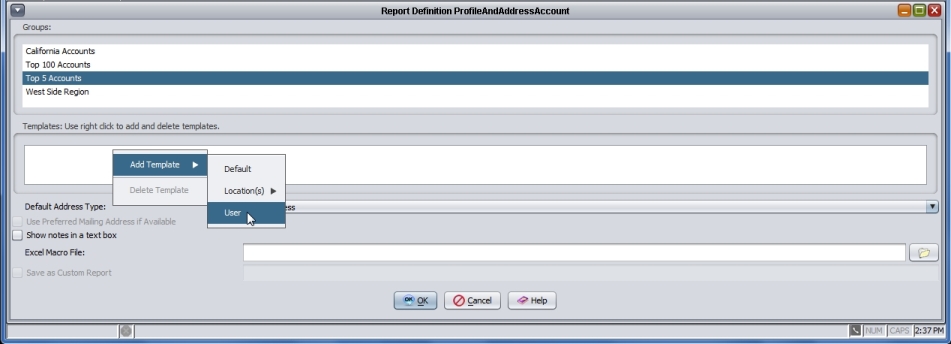
- In the Report Definitions window highlight the group you wish to use. In our case below we selected Top 5 Accounts . Then right click in the Templates pane. When the pop up menu appears navigate the mouse courser to the desired level at which you would like to save this template. In the below instance we will save the template to the user level.
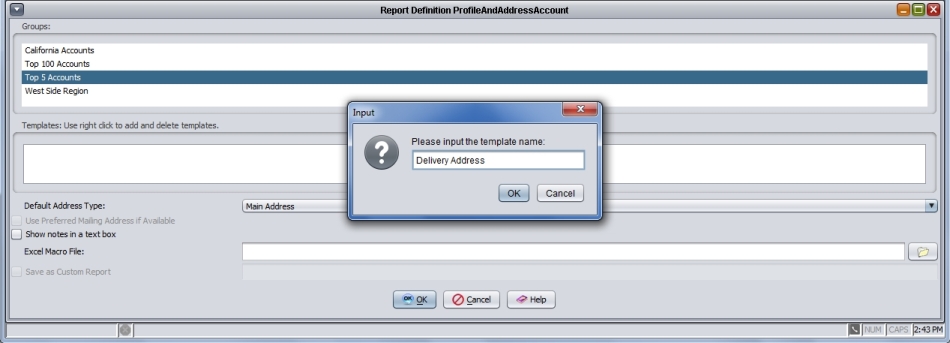
- When the Input dialog appears type in a name for the template and press the OK button. The name should be as descriptive as possible to the purpose that the template serves. In our case below we will call the template Delivery Address because this template will be yielding the delivery addresses of any of the account groups to which we apply the template.
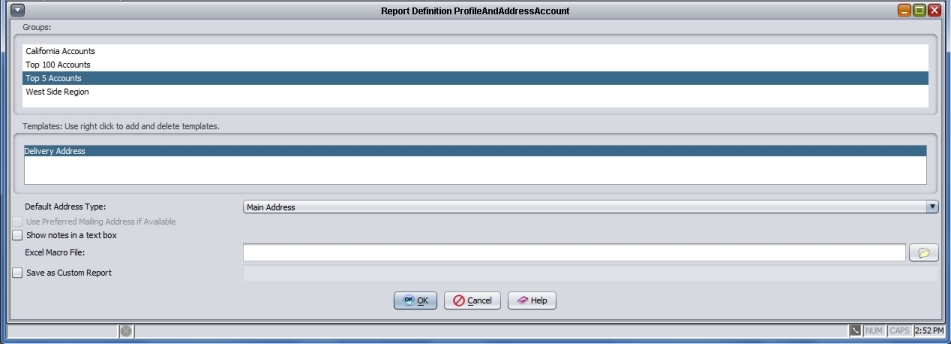
- Notice in template named Delivery Address appears in the Template pane. You can see that there is a group that has been selected and highlighted called Top 5 Accounts and the template named Delivery Address is also selected and highlighted. This indicates that these are going to be the components used to generate the report. To run the report press the OK button.
- After you press OK , the Customize Table Tools window will open. In the left window pane select the fields you wish to display in the report by checking the corresponding check boxes. I have checked Account Name , Address Line 1 , City , State , and Zip Code . When you are done select the Add button.
Note: The fields you select here are going to be the fields that are recorded in the template that you created. You can edit these fields later if you so wish.
- After you press the Add button the fields will appear in the right window pane as columns. Here you can rearrange the order of the columns by dragging them by the column headers in either direction. When you are done press the OK button to view the report.
- Top 5 Accounts.
The Profile and Address Level (Custom Report)
In the above examples we learned how to run a standard report and also how to create a template that can be used in a variety of reports using various groups. Now we will learn how to create a custom report. In the above example we created a report that gave us the delivery addresses of our top 5 accounts. If this was a report that you needed to run on a consistent bases or if you wanted to allow your shipping department to have the ability to run this report any time they needed it, you can create a custom report that can be accessed with ease.
- From the Main Desktop menu select Reports , then Profile and Address , and then Account from the expanded menu.
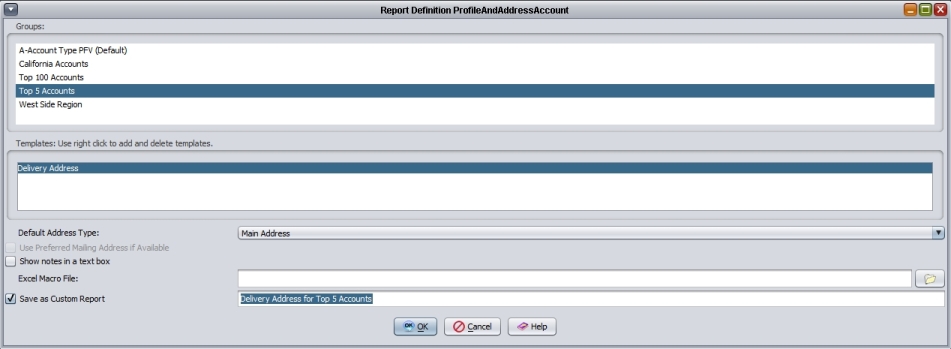
- In the Reports Definition window highlight the group titled Top 5 Accounts and highlight the template titled Delivery Address . Check the Save as Custom Report check box and give the custom report a name. In the below example we called the custom report Delivery Address for Top 5 Accounts , then press OK.
- After you press OK , the Customize Table Tools window will open. In the left window pane select the fields you wish to display in the report by checking the corresponding check boxes. I have checked Account Name , Address Line 1 , City , State , and Zip Code . When you are done select the Add button.
- After you press the Add button the fields will appear in the right window pane as columns. Here you can rearrange the order of the columns by dragging them by the column headers in either direction. When you are done press the OK button to view the report.
- This report is now a custom report that can be accessed quickly.
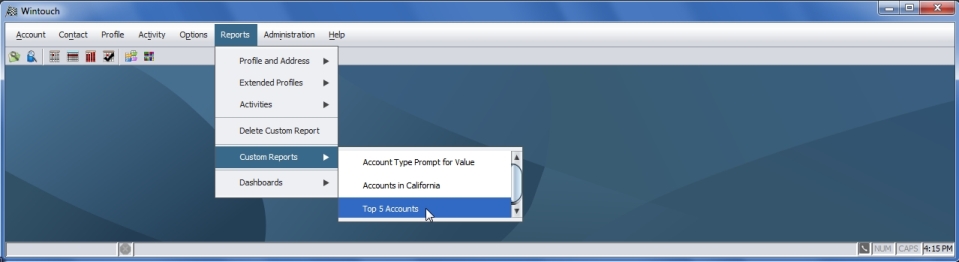
Locating and Using the Custom Report
From the Main Desktop menu select Reports , then Custom Reports from the drop-down menu, and then select the custom report of your choice. In this case the report we created can be selected and the report will open.
Viewing, and Copying Custom Reports
A Custom Report consists of a group and a report template combined. The group and report template that make up a custom report each have their own access level. A Custom Report will only be viewable/accessible at the level of the lowest level component, e.g. a Custom Report with a Default Report Template, but only a User Group, would only be visible to the user who created it. To determine who will be able to view a Custom Report in your system, consult the chart below.
A Custom Report can be copied by an Administrator to any user location regardless from which level the components were made. If there is a duplicate custom report name, or any duplicate components that are used in a custom report found in the target location to which to report is being copied, Wintouch will label the custom report name, group, or template with the duplicate name while placing a (1) (2) or (3) and so on, at the end of the duplicate name indicating it is a copy. For example, if a group named California Customers is used in 3 different custom reports in the same user location, the group will be seen in Group Definitions as California Customers , California Customers (1), California Customers (2). All custom reports, groups, and templates can be renamed by the Administrator.
Note: Any Custom Report that is created by a Non-Administrator User will only be viewable by the user that created the Custom Report. The following chart pertains to the Administrator User.
Viewing Parameters
| Log In User |
Group Level in Group Definitions |
Template Level in Report Definitions |
Custom Report Visibility |
| Administrator |
Default |
Default |
Everyone |
| Administrator |
Default |
Location |
Selected Location |
| Administrator |
Default |
Login User |
Login User |
| Administrator |
Location |
Default |
Selected Location |
| Administrator |
Location |
Location |
Selected Location |
| Administrator |
Location |
Login User |
Login User |
| Administrator |
Login User |
Default |
Login User |
| Administrator |
Login User |
Location |
Login User |
| Administrator |
Login User |
Login User |
Login User |