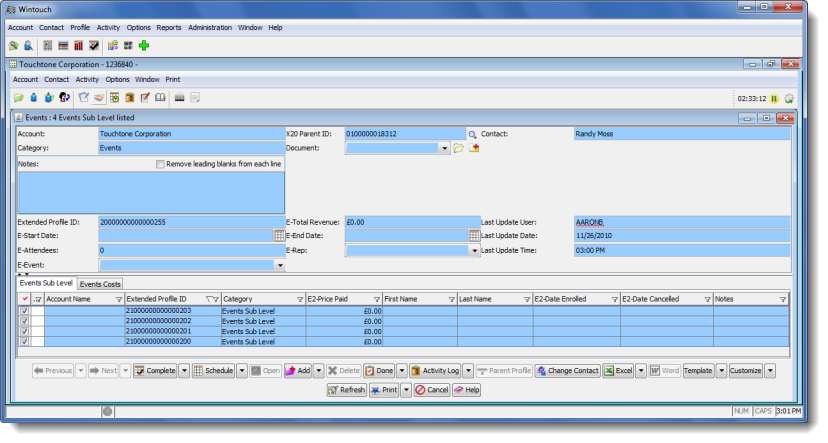

Wintouch CRM gives you a central storehouse where the different divisions of your organization can share data on prospects, customers, partners, competitors and employees, allowing you to customize the presentation of your data in a way that is most useful to each division. Data that you want to see immediately, from whichever division, whether marketing, sales, accounting, or customer service, can be displayed on the Account or Contact Summary screen, the main screen in Wintouch. But, each of the divisions mentioned above also want access to more detailed information specific to their relationship with the customer. Such information is likely too detailed to be contained in the Account or Contact Summary screen. For instance, it might make sense to display year-to-date sales on the Account Summary screen for a customer, but the individual orders would have to be stored in a separate screen, which is the Extended Profile. 2nd Level extended profiles include both summary and detailed information. The summary information is contained in the profile, or header, section and a line item listing is contained in the listing, or detail, section. Using the Sales Order History example, the profile section would contain order summaries and the listing section would contain a list of the line item details. A common use of the 2nd Level Extended Profile is recording transactions.
Customizing Your 2nd Level Extended Profile Window
As with all windows in Wintouch, the 2nd Level Extended Profile is customizable. When designing the layout of your 2nd Level Extended Profile, consider the following principles:
- Any fields that are the same for each line item should be included in the profile section.
- Only items that are specific to the line item should be included in the listing section.
User-Defined Fields
Wintouch Extended Profiles are designed to model your business processes. Thus they will be unique to your company and the way you do business. Extended Profiles include many user-defined fields created specifically for your environment.
Note: The Notes field is generally included in Extended Profiles. Tab to the Notes field to document any free-form information regarding the account or contact as it relates to the Extended Profile.
Previous: Press this button to view the previous extended profile found in the profile listing.
Next: Press this button to view the next extended profile found in the profile listing.
Complete: Select this button to complete an activity that will be attached to the active profile.
Schedule: Select this button to schedule an activity that will be attached to the active profile.
Open: Press this button to open the selected line item (Child Profile).
Add: Use this button to add a new line item to the Listing section of the 2nd Level Extended Profile.
Delete: Highlight to select the line item(s) you would like to delete, and press the delete button.
Done: Use this button to save all inputs and changes, and exit the 2nd Level Extended Profile.
Activity Log: Press this button to view the activity log of all the activities attached to the active profile.
Parent Profile: When you have opened and are viewing a line item (Child Profile), select this button to go back to the parent profile.
Change Contact: Select this button the attach the profile to another contact of your choice.
Note: The Change Contact option is only available when the extended profile is of the Contact or Account/Contact level. Account related extended profiles do not have this option.Excel: Highlight to select the line item you would like to export to Microsoft Excel, then press the Excel button.
Word: Highlight to select the line item you would like to export to Microsoft Word, then Press the Word button.
Template: Select this button to open up a predefined template that was generated in the Template Builder.
Customize: Use this button to add, delete, and determine the display properties of the fields in the window. The 2nd Level Extended Profile is divided into two sections: the profile, or header, section and the listing, or detail, section. You will customize one section at a time, by selecting either Profile or Listing from the drop-down list. Click here for guidelines on which fields to include in each section.
Refresh: Use this button to update the data on the page.
Print: Use this button to print the line item listing section of the 2nd Level Extended Profile.
Cancel: Use this button to exit the window without saving any inputs or changes, and exit the 2nd Level Extended Profile.
Help: Use this button to access this online help.
When you double click on any of the child profiles or highlight one of them and press the Open button, the child profile window will open.
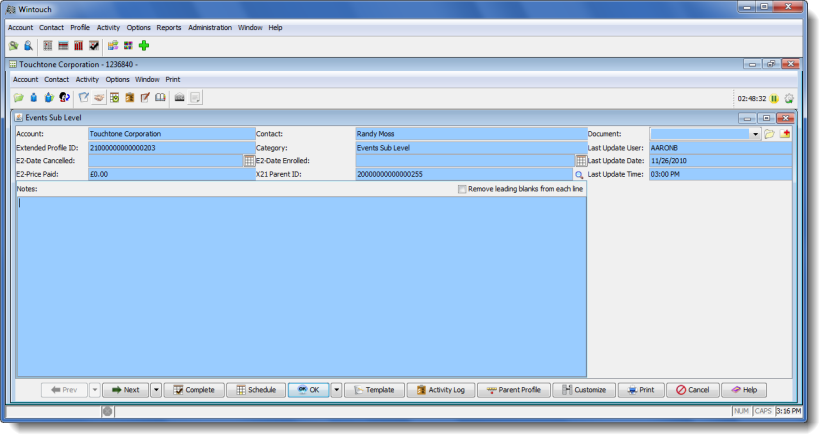
Previous: Press this button to view the previous child extended profile found in the profile listing.
Next: Press this button to view the next child extended profile found in the profile listing.
Complete: Select this button to complete an activity that will be attached to the active profile.
Schedule: Select this button to schedule an activity that will be attached to the active profile.
OK: Press this button to open the selected line item (Child Profile).
Note: You must press the OK button to save any changes that have been made.Template: Select this button to open up a predefined template that was generated in the Template Builder.
Activity Log: Press this button to view the activity log of all the activities attached to the active profile.
Parent Profile: When you have opened and are viewing a line item (Child Profile), select this button to go back to the parent profile.
Customize: Use this button to add, delete, and determine the display properties of the fields in the window. The 2nd Level Extended Profile is divided into two sections: the profile, or header, section and the listing, or detail, section. You will customize one section at a time, by selecting either Profile or Listing from the drop-down list. Click here for guidelines on which fields to include in each section.
Print: Use this button to print the line item listing section of the 2nd Level Extended Profile.
Cancel: Use this button to exit the window without saving any inputs or changes, and exit the 2nd Level Extended Profile.
Help: Use this button to access this online help.