This window allows you to customize the look and feel and the functionality of your terminal emulation applet. Depending on your applet configuration, only a subset of the following settings may be available to you. Select the Apply button to activate your settings. This window includes the following tabs:
These settings will be in effect after using the disconnect and connect buttons on the toolbar. Depending on your configuration, some or all of these settings may be disabled.
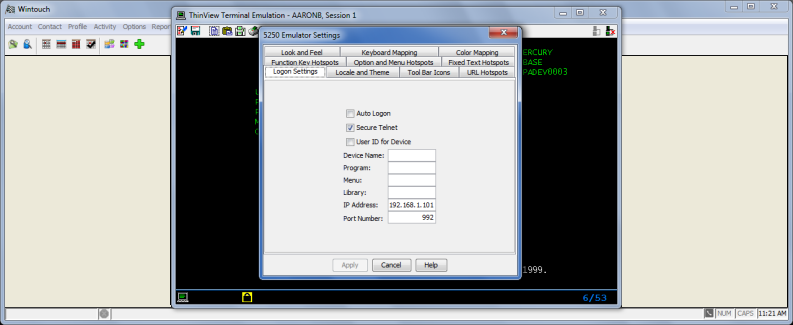
Auto Logon: This determines whether or not the emulator automatically attempts to sign the user to the emulation session. When this box is checked, you will be automatically logged into the emulation session when it is opened.
Secure Telnet: This box should be checked if encryption is needed for this emulation applet. This option is only applicable if using OS/400 V4R4 with an active secure Telnet server.
Note: The Secure Telnet option should be enabled if you are sending any information over the Internet.
User ID for Device: Check this box if the ThinView Logon user ID should be used as the display device name.
Device Name: Input a specific name to be used as the display device.
User ID: This is the user ID that automatically signs onto the the terminal emulator. The user ID is not case-sensitive. If the User ID for Device is checked, you may want to clear this field and have the user be prompted for a User ID.
Password: This is the password for your user ID. The Password is not case-sensitive. If the User ID for Device is checked, you may want to clear this field and have the user be prompted for a password.
The Program, Menu, and Library fields correspond to the same fields on the Sign On screen, and allow the initial program, initial menu, and current library to be specified for the terminal session.
Note: Please see your AS/400 manuals for further information on these features
Program: This refers to the name of the initial program to launch on the AS/400, and overrides any initial program specified in the user profile.
Menu: This overrides the initial menu setting in the user profile.
Library: This overrides the current library specified in the user profile.
Altering the IP address and Port number allow the emulator to connect to a Telnet server on an AS/400 other than the system running the ThinView server.
IP Address: This is the IP address for the AS/400 Telnet Server. *DEFAULT for emulator IP address will dynamically pull in IP address from Wintouch connection.
Port Number: Defaulted to the Telnet port number of 23. If Secure Telnet is selected, the default port number changes to 992.
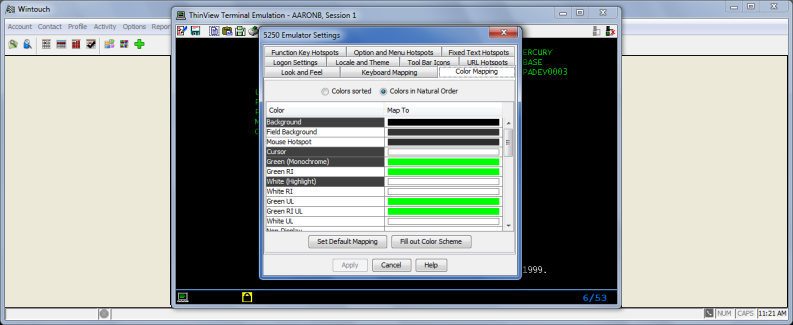
This tab allows you to select a desired Character Set, and to select one of several predefined "themes" for your emulation session, combining the "Color Terminal," "Display Column Separators," and "GUI Look and Feel" checkboxes, the Status Line style, font, and background image, from the "Look and Feel" tab, and the color scheme, from the "Color Mapping" tab. Note that unexpected results can occur if your emulator is set to a character set other than the one your AS/400 system is expecting, and that the screen appearance may be temporarily quite bizarre if you select a theme that changes the "Color Terminal" setting while you are online.
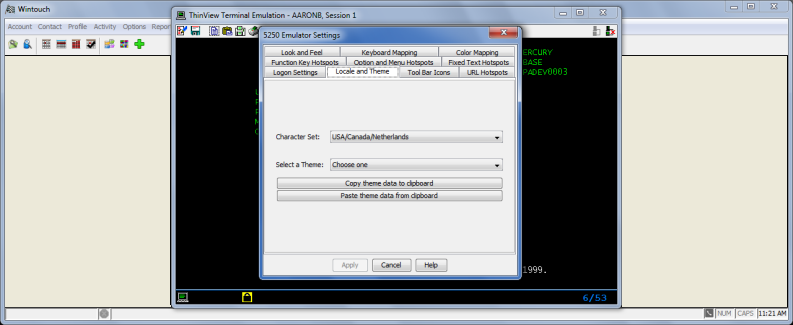
Character Set: Choose from a list of available Character Sets. The default setting is the obtained from the AS/400 where the ThinView server is located.
Select a Theme: Select any theme from the list. When you click the "Apply" button, the theme will be applied to the session, and the drop-down list will, by the next time you open this tab, be reset to "Choose one."
Copy theme data to clipboard: This will copy the "theme" data, including any changes you have made in the various Settings tabs, into the system clipboard, encoded as a text string that can be pasted into another emulation session, or stored in a text file.
Paste theme data from clipboard: This will paste any valid theme data string that is on the system clipboard into the current session. Please note that if you attempt to paste something other than a valid emulation theme string into the emulation session, it will be rejected, and there is a possibility that the current appearance settings may be corrupted, and may have to be reset from scratch, either manually or by loading a valid theme.
Several of the tool bar buttons can now be supressed in emulation applets. When in development mode, buttons to be supressed will be grayed out, but not disabled; this allows them to be used while the applet is being created. When the applet is launched, the supressed buttons do not appear at all in the tool bar.
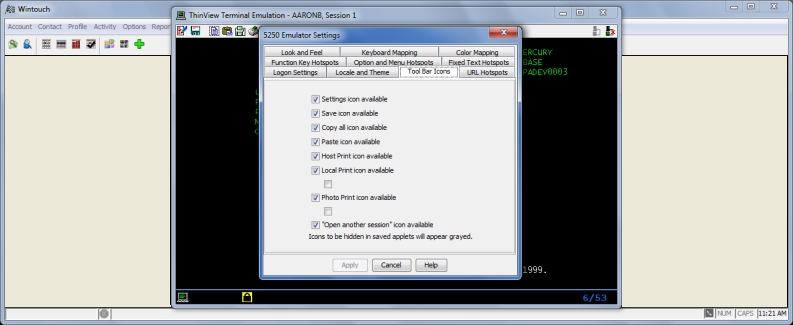
The Terminal Emulator treats various regions of the Green-Screen as hotspots (buttons). When you click on them, they perform a pre-defined action. There are different types of hotspots that can be enabled/disabled according to your preference.
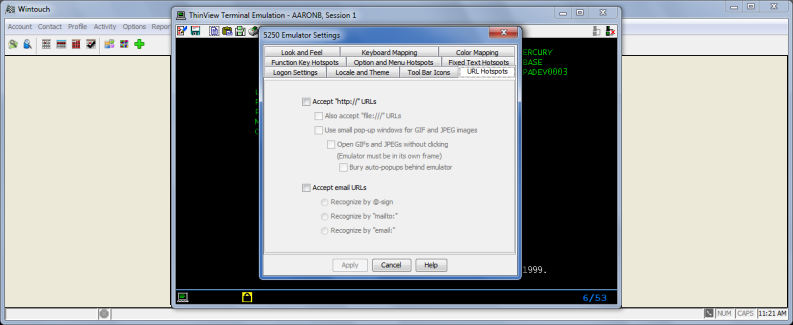
Accept "http://" URLs: When this hotspot is enabled, you can click on any http:// url that is visible within the Terminal Emulator. For example, you could click on http://www.Wintouch.com if it appeared on the Green-Screen and it would open your web browser to Wintouch.com.
Also accept "file:///" URLS: If file:/// is enabled, then you can click on any file:/// path that appears in the Green-Screen. For example, if you clicked on file:///C:/invoice.txt in the Green-Screen, then invoice.txt will open.
Use small pop-up windows for GIF and JPEG images: If checked, then clicking on GIFS or JPEGS will open a small viewing pop-up window.
Open GIFS and JPEGs without clicking (Emulator must be in its own frame): If checked, then scrolling over a GIF or JPEG file will open a small viewing window.
Bury auto-popups behind emulator: If checked, any window that would pop-up by clicking on a hotspot will open behind the Green-Screen.
Accept email URLs: Recognizes email Urls as a hotspot. Select the appropriate Radio Button for how you want the email Url recognized. For example, if you chose the the 'Recognize by @-sign" option, then JohnP@TouchtoneCorp.com would open your email client if clicked.
Recognize by @-sign.
Recognize by "mailto"
Recognize by "email"
The Terminal Emulator recognizes up to 24 function keys which can be represented in the form "Fnn=xxxx xxxx".
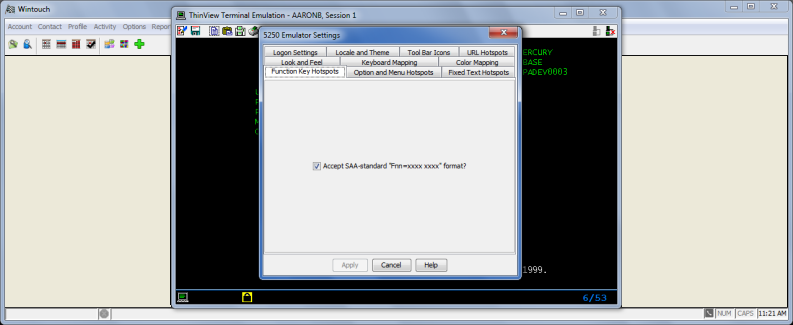
Accept SAA-standard "Fnn=xxxx xxxx" format?: If clicked, the Terminal Emulator will recognize function keys of the form "Fnn=xxxx xxxx" as hotspots. For example, F5=Refresh will be a hotspot.
There are options that you can choose for accounts in the emulator. They take the form of 2=Edit, 11=Credit Card Info.
There are menu options that you can choose. They take the form of 1.Command Line
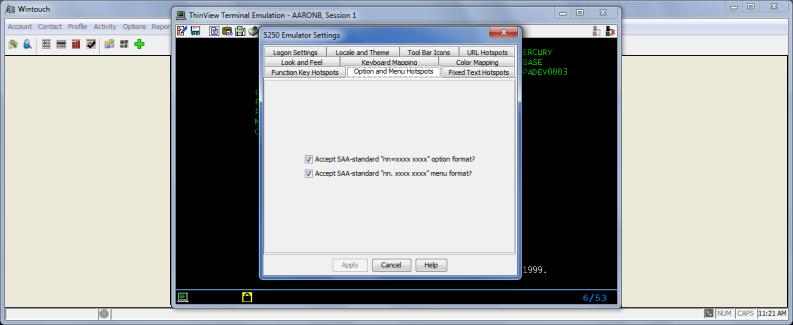
Accept SAA-standard "nn=xxxx xxxx" option format?: Makes Options of the form "nn=xxxx xxxx" into hotspots.
Accept SAA-standard "nn. xxxx xxxx" menu format?: Makes Menu Options of the form "nn. xxxx xxxx" into hotspots.

Clicking on "More..." sends Page Down: Makes "More..." text a hotspot that sends the page down.
Clicking on "Bottom" sends Page Up: Makes "Bottom" text a hotspot that sends the page up.
Clicking on "Enter" sends Enter: Makes "Enter" text a hotspot that sends Enter.
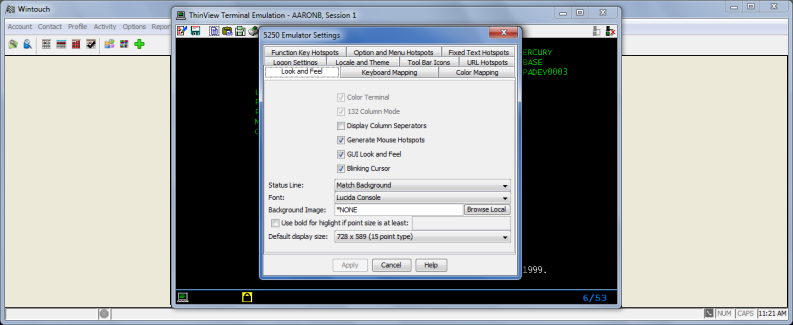
Color Terminal: Use this checkbox to select a monochrome or color terminal. This setting is only available after using the disconnect button on the toolbar and any change will be in effect after reconnecting.
132 Column Mode: Use this checkbox to determine if the model of terminal the emulator appears as to the host will support 132 columns. This setting is only available after using the disconnect button on the toolbar and any change will be in effect after reconnecting.
Display Column Separators: Use this checkbox to determine whether column separators (small dots between the characters for certain display attributes) are displayed or suppressed.
Generate Mouse Hotspots: Use this checkbox to select whether on-screen function key labels, menu items, and selection options (formed according to SNA CUA guidelines), as well as the words "Enter," "More...," and "bottom," are used to generate mouse-sensitive hotspots.
GUI Look and Feel: Use this checkbox to select whether or not editable fields are given an "indented" appearance, and mouse hotspots are given a "raised" appearance.
Blinking Cursor: Use this checkbox to select whether or not to make the cursor blink.
Status Line: Using this drop-down list select whether a terminal-style status line (with the same background color as the terminal pane), a gray "GUI-look" status line, or no status line at all will be shown.(If you opt for no status line at all, a status line will still appear temporarily, whenever there is a message waiting. It will disappear when the message icon does.)
Font: Using this drop-down list, select an emulation font. All TrueType fonts installed on the local system are available; only monospaced fonts, such as "Lucida Console" or "Courier New" are recommended.
Background Image: This text field allows you to specify any GIF, JPEG, or PNG file as your background image, by entering a "file:///" URL (for a file you can reach through your local file system), an "http://" URL (for a file you can reach from a web browser), or an "internal://" URL (for a file internal to the "e_images" directory within the ThinView JAR). The "Browse Local" button adjacent to this text field allows you to browse your local and LAN drives for GIF, JPEG, and PNG files (with the appropriate extensions). The original image will be scaled to fit the emulation panel.
Use bold for highlight . . . This checkbox and text field allow you to select whether or not the emulator attempts to use bold-face type for highlighted text, and the smallest size of type for which this is done. Note that depending on your font, bold face type may be hard to read at small point sizes, and/or may be rendered with proportional spacing
Default display size: This drop-down list selects the initial size for an emulation session. "Maximized" runs the emulation session full-screen, while the other sizes give the dimensions in pixels, and the point size of the type for 80-column mode.
The left side of this tab displays the various keyboard functions that
are available within a ThinView terminal emulation session. Function/Key Mapping: Click on any Key Mapping and type a replacement
function key. Your new choice will appear in the Key Mapping column. Set Default Mapping: This restores the key mapping to the standard
default.Keyboard Mapping