
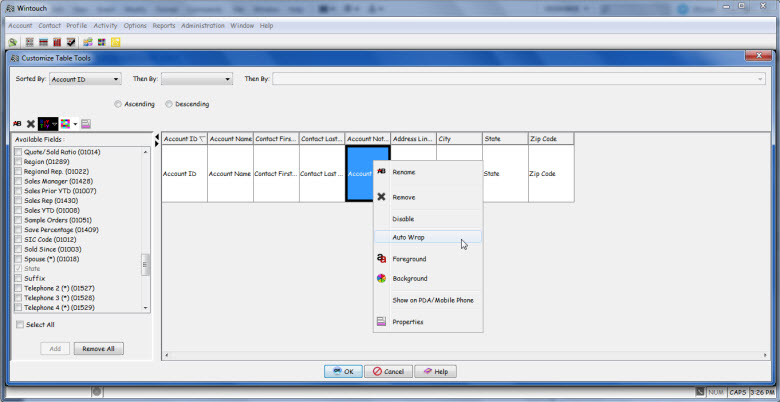
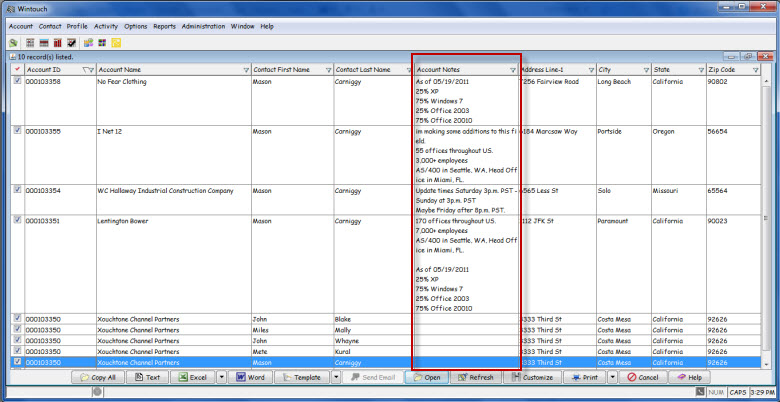
View the Auto Wrap Feature
The Customize Table Tools feature enables the Wintouch Administrator to design and maintain all listing windows, including the activities calendars, reports, report templates, account and contact listings, and extended profile listings. Open the Customize Table Tools window by pressing the Customize button at the bottom of any listing window.

The Customize Table Tools window is divided into two sections: Available Fields and the Design Panel.
The fields in this scroll-down list are available for use in the design and layout of the listing window you are customizing. The field names in this list correspond to the field names in your Wintouch environment. To include a field in your layout, click the check box to the left of the field name, then press the Add button.
Note: Fields will be displayed from left to right in the order you check them in the Available Fields pane.
Select All: Select this check box to check all of the fields in the Available Fields pane.
Add: Select this button to add the selected fields to the Design Panel.
Remove All: Select this button to remove all the fields from the Design Panel.
The Design Panel shows you the layout of the fields you have selected, and allows you to rearrange and set the properties of those fields.
To Rearrange the Fields in the Design Panel: Click and Drag the field to the desired location.
To Change the Appearance and Other Characteristics of a Field: Right-Click within the field to access tools for changing its appearance and other characteristics. See the list of right-click options below.
The following are the options presented when you right-click on any field in the design panel:
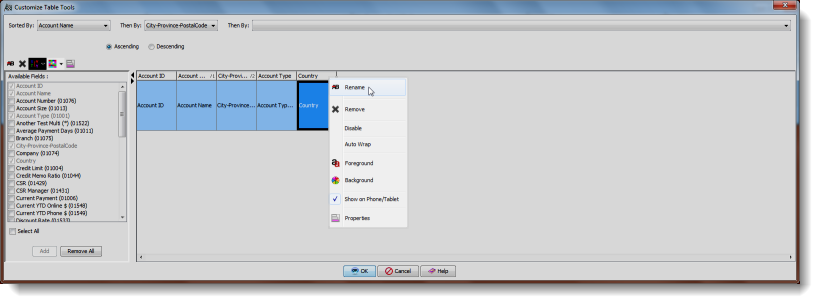
Rename: Opens a dialog box prompting the user to change the column name.
Remove: Removes the field(s) from the Design Panel.
Disable: Select Disable to make the field display-only. Otherwise the field will be editable by users. A check mark next to Disable indicates that the field is display-only.
Note: Some Wintouch system fields are disabled from the backend. Such fields cannot be enabled using the right-click menu.Foreground: Allows you to select the color of the field foreground.
Background: Allows you to select the color of the field background.
Show on Phone/Tablet: If this box is checked, the field will be available for display on your PDA/Mobile Phone if using Wintouch for WebSphere application.
Note: You must have Wintouch for WebSphere along with IBM WebSphere Application Server and WebSphere Portal software to use this feature.Properties: Allows you to set a minimum column width along with changing the foreground and background colors and the column name.
In order to save time you can customize the foreground and background color of multiple fields at the same time. To do this click on the desired fields while at the same time holding down the CTRL key or by simply left clicking and scrolling the mouse. Next, right-click to change the foreground and background.
Note: Only color can be changed for multiple fields at a time. Other properties must be changed one field at a time.

The records displayed in Listing Windows can be sorted in ascending or descending order by the values of any column.
1. Select either Ascending or Descending.
2. Select the Field Name of the Column by which you wish to sort your records.
In some instances there may be more data within a field that is viewable. The Auto Wrap feature allows the user to individually select and set auto wrap to display all the data in that field. This can be done in all the listing windows. In the Customize Table Tool window simply right click on the desired field and select the auto wrap option.
 : Select a field and click on this icon to rename the field. You may only rename one field at a time.
 : Select a field or fields and click on this icon to remove the selected fields from the display.
 : Select a field or fields and click on this icon to change the foreground color. You can change the color of multiple fields at once.
 : Select a field or fields and click on this icon to change the background color of multiple fields at once.
 : Select a field or fields and click on this icon to change the MINIMUM column width along with changing the foreground and background colors and the column name.
Note: Setting a smaller Column Min. Width will NOT decrease the ABSOLUTE width of the column as there is a default column width, which is based on the number of characters in name and value of the field. If you want a column width smaller than the default, you must adjust the column width manually by using the click and drag feature within the table itself. If you want a column to appear bigger than the default width, setting a larger Column Min. Width would work.
OK: Saves the customization layout and any changes you have made at the user, user location, or default level. After you select OK, a Save As dialog box will appear requiring you to save the changes at one of the three level options.
Follow this Link: To Learn More About the Save As dialog.
Cancel: Exits the design window without saving the settings.
Help: Displays online help for this window.