
This window will allow you to add a new contact (without associating it with an account). You can get to this window by selecting Contact from the Main menu bar then "New" from the pull-down menu or by holding down the Alt and F6 keys at the same time (Alt-F6).
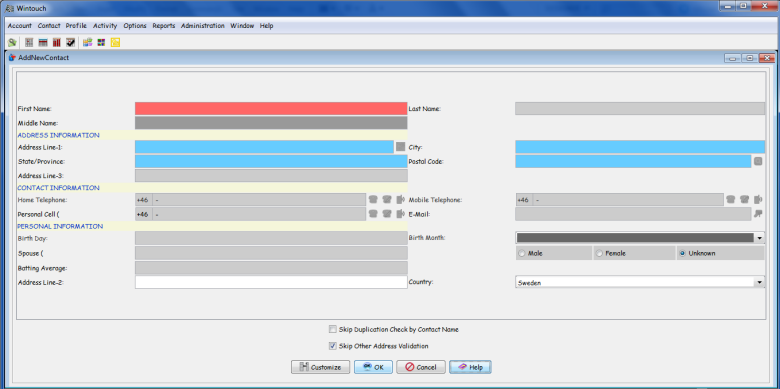
First Name: Enter the new contact's first name in the First Name field.
Middle Name: Enter the middle name of the main contact at this account (if applicable).
Last Name: Enter the new contact's last name in the Last Name field.
Address Line-1: Enter the Account or Contact Street Address here. For example 124 North El Domingo Street would go here.
Address Line-2: Enter additional address information here.
Address Line-3: Enter additional address information here.
City: Tab to this field to enter or edit a city name.
State/Province: Tab to this field to enter the state/province the address corresponds to.
Postal Code: Tab to this field to enter the postal code.
Note: If this is a U.S. or Canadian address, when you tab or click off of Postal Code after entering Address Line 1, the City and State/Province fields will automatically populate.
Country: Enter the Country the Contact is in a majority of the time.
Note: The default country may be set in the Preferences window.
Home/Office/Mobile Telephone: Tab to this field to add a contact's home telephone or cellular telephone number (Do not use parenthesis or hyphens).
E-Mail: Enter the Contact's Personal E-mail.
Birth Month: Enter the two digit birth month.
Birth Day: Enter the two digit birthday.
Gender Selection Radio Buttons: Select the radio button for the main contact's gender. Do this by left clicking on the circle to the left of male of female. Your selection will have a black dot in the center.
Skip Duplication Check by Contact Name: Wintouch will automatically search for duplicate records from your database based upon the contact's name(regardless of punctuation and capitalization).If you wish to skip the search by contact name, check "Skip Duplication Check by Contact Name".
Skip Other Address Validation: Bypasses internal address validation systems.
OK: Select this button to create a new contact and proceed to the Contact Profile, or to the Duplicate Contact List if there are duplicate contacts in the database.
Customize: Select this button to add, delete, and arrange fields in the active window.
Cancel: This button exits the window without creating the new contact.
Help: Displays online help for the active window.