
The New Account window allows you to create a new account. Open this window by selecting Account from the Main Desktop Menu, then selecting New from the drop-down menu, or by using the shortcut key [Alt+F5].
Account Name: Enter the full name of the account here. The name you enter here will be displayed on the Account Summary.
Account Type: Enter the type of account in this field. Some typical account types are Customer, Prospect, and Distributor .
Account Size: This field allows you to choose a selection from the drop-down box that will indicate the significance of the account by it's size.
Account Country: Enter the account country in this field.
Account Telephone: Enter the Account's main telephone number (and if necessary, the country code) without using hyphens or parentheses.
Account Fax: Enter the Account's Main Fax if they have one.
Web Site: If the Account has a website you can enter it in this field. Selecting the button to the right of this field will launch your browser to go to the website entered.
Salutation: Select from the drop-down list and enter the primary contact's courtesy title.
Job Title: Tab to this field to enter or edit the contact's job title.
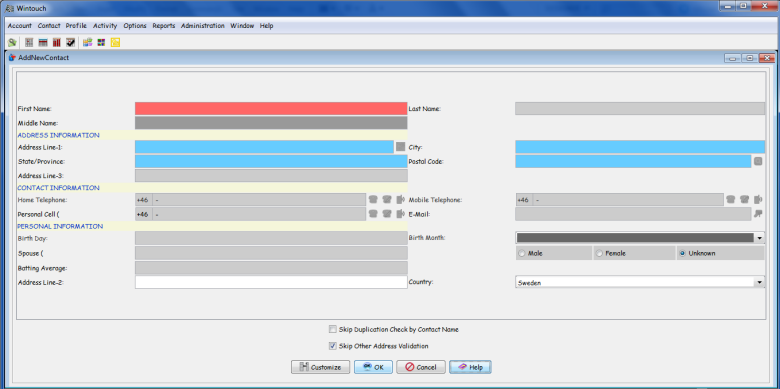
First Name: Enter the first name of the main contact at this account.
Middle Name: Enter the middle name of the main contact at this account (if applicable).
Last Name: Enter the last name of the main contact at this account.
Contact Telephone: Enter the telephone number of the main contact for this account.
Contact Extension: Enter the main contact's extension (if applicable).
Contact Fax: Enter the main contact's fax (if applicable).
E-Mail: Enter the main contact's e-mail address.
Home/Cell Phone: Enter the contact's home telephone or cell phone number.
Note: If you are unable to enter all of the required digits in the telephone number in this field, make sure that the country field (below) reflects the correct country location of the account..Contact Country: Enter the country that your contact is located in.
Choose either Account Address or Contact Address, then enter the address.
Address Line-1: Enter the Street Address here.
Address Line-2: Enter additional address information here.
City: Enter the City here.
State/Province: Enter the State or Province here.
Postal Code: Enter the Postal Code/Zip Code here.
Note: The default account country may be set in the Preferences window. The default country will determine the address fields displayed.Note: There are many fields that can be added to your Add New Account window by selecting the Customize button and adding the fields of your choice.
Account or Contact Address: Select the Account Radio button if you want the address you have entered to appear in the Account Summary Window as the Main Address. Select the Contact radio button if you want the address you enter to appear in the Contact Summary Window as the Main Address.
Gender Selection Radio Buttons: Select the radio button for the main contact's gender. Do this by left clicking on the circle to the left of male of female. Your selection will have a black dot in the center.
Name Spelling Verified Check Box: This check box will indicate if the spelling of the contact's name has been verified. Click once to place a check in the Name Spelling Verified box.
Skip Duplication by Account Name / Skip Duplication Check by Contact Name: Wintouch will automatically search for duplicate records from your database based upon the contact's name, account name, e-mail address, and telephone number (regardless of punctuation and capitalization). If you wish to skip the search by account or contact name, check the appropriate box.
Note: Wintouch Address Validation only applies to U.S. and Canadian addresses. Validation occur after you have entered Address Line 1, the Postal Code, and then have tabbed away or clicked off of the Postal Code..
Skip Duplication By Domain Name:If you wish to skip the search by Domain Name, check the box.
Skip Other Address Validation: Bypasses your internal address validation system.
Skip Account Profile: When you press the OK button in the Add New Account window, the Account Profile window opens by default. Select this check box to circumvent the Account Profile window.
OK: This button saves the new account information, performs the duplication check, and (if no duplicate accounts/contacts are found) opens the Account Profile window for you to add additional information.
Customize: Select this button to add, delete, and arrange fields in the active window.
Cancel: This button exits the window without saving the new account information.
Help: Displays online help for the active window.